
Advice needed: Material and weld process type for this assembly.
- Thread starter Freedommachine
- Start date
MwTech Inc
Well-known member
Crazy thought here.......if you had a rolled crimp at the block end , any way to machine the block with an internal raised bead?
Would have to split the block, getting a bit messy here........The notch may pose a problem with this too.
Just thinkin outloud.........if the notch didn't go all the way to the end?? Does it have to?? if you could just cut the notch like a key way with the front solid, the block would crush the tube and be quite tight.
Course this is all useless if what pushes on the spring needs to fill the tube.
Ramblin on here ,,you need an internal expander to put a bulge in the tubing with a matching groove in the block.
Probably not for 200 parts.....
If we are back to welding, a rotator would be nice as you could set your hand and keep a very steady torch
Last edited:
Barbter
Well-known member
Ref welding....Worse case....mill a 50 thou deep groove around your tube bore leaving 50thou wall section. Then you're welding thin to thin.... 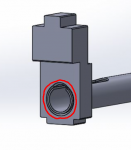
Mud
Well-known member
Can you TIG braze w/silicon bronze wire? That's often done in that case, lower heat is much easier to control without melting the thin part.
Inferring from the design, there must be a spring in the tube and a sliding element with an arm that sticks out that slot. The slot probably needs to be open to load the arm and may need to stay open for something to pass through.Crazy thought here.......if you had a rolled crimp at the block end , any way to machine the block with an internal raised bead?
Would have to split the block, getting a bit messy here........The notch may pose a problem with this too.
Just thinkin outloud.........if the notch didn't go all the way to the end?? Does it have to?? if you could just cut the notch like a key way with the front solid, the block would crush the tube and be quite tight.
Course this is all useless if what pushes on the spring needs to fill the tube.
Ramblin on here ,,you need an internal expander to put a bulge in the tubing with a matching groove in the block.
Probably not for 200 parts.....
If we are back to welding, a rotator would be nice as you could set your hand and keep a very steady torch
If that tube could be closed, you sure could do some slicker attachments than weld or brazing.
Freedommachine
Active member
Yep, it do. It compresses the spring into the tube and then a finger pops up in the slot and grabs a hold of the rectangular block.Course this is all useless if what pushes on the spring needs to fill the tube.
I will definitely be getting a rotary positioner. I'm not the artistic type, free hand doesn't suit me well on small delicate welds.
This is an interesting solution. I might have to try one like this for destructive testing at the very least. Milling the weld prep wouldn't add much to the cycle time and could really leverage weld control in my favor if needed.Ref welding....Worse case....mill a 50 thou deep groove around your tube bore leaving 50thou wall section. Then you're welding thin to thin....
Yep, I have some that I use frequently on another job. I use it for locking together slip fit components with silicon bronze plug welds. I have gone back and forth over whether or not I should just skip over the other methods and go straight to tig brazing the joint.Can you TIG braze w/silicon bronze wire? That's often done in that case, lower heat is much easier to control without melting the thin part.
Tig brazing is what lead me to finally quit being lazy and decide to set up some kind of destructive testing. Instead of wondering if the joint could possibly crack, I'll try two or 3 different methods and make them crack.
MwTech Inc
Well-known member
no chance for stainless?
Bit more cost up front, but could end up in overall lower costs........
304 easy weld, no finishing required, no internal tube rusting , spring will always have clean surface to "slide" against , never worrying about cracking welds, still could roll end or plug would be easy weld in.
I would think benefits explained to customer would be an easy sell
Mcmaster
8457K58 .028 wall 9/16 od |
Last edited:
Freedommachine
Active member
I was thinking the same thing. I looked into that a few days ago. Unfortunately it was far too expensive. Stainless is $10-$13 per foot. The tube laser shop quoted me $12 each per finished tube including material.no chance for stainless?
Bit more cost up front, but could end up in overall lower costs........
304 easy weld, no finishing required, no internal tube rusting , spring will always have clean surface to "slide" against , never worrying about cracking welds, still could roll end or plug would be easy weld in.
I would think benefits explained to customer would be an easy sell
Mcmaster
8457K58 .028 wall 9/16 od
The customer? I can tell you there's no arguing with that guy, believe me I've tried lol! (I am the customer)
Most everything I make is sold to small retailers or direct to consumer. If you want a real laugh, you should see my cash flow statements, like a friggin rollercoaster.
This is assembly 1 of 5 for this product. There are 22 individual p/n's to make or obtain excluding pins and screws.
MwTech Inc
Well-known member
You're not the only one.........cash flow.....
It flows alright.......not how I want it to.......
It flows alright.......not how I want it to.......
Plastikdreams
Well-known member
Aluminum ring to back the part, tig the piss out of it...easy job not so sure why everyone is making a big deal of it.
Freedommachine
Active member
Really? Is that all?Aluminum ring to back the part, tig the piss out of it...easy job not so sure why everyone is making a big deal of it.
Whew, I'd hate to be the rest of us right now, don't we look foolish!

Last edited:
Plastikdreams
Well-known member
It's really that simple.Really? Is that all?
Whew, I'd hate to be the rest of us right now, don't we look foolish!
")
Freedommachine
Active member
Update:
Thanks again for everyone's help, this thread was very beneficial for me.
First, @Garwood idea for the big pipe cutter bead roller worked great, even turning the tube by hand. However, my shop made roller needs a bit of work. I used a 1/8" radius on either side of an 1/8" wide roller. I figured if the roller came to a slight point it might help to start the bead.
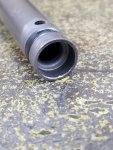
This worked up to the point where the material became thin and cracked. It wasn't terrible though and might even be preferable because it rolled one side in and cut off the remaining material. A few taps with a hammer and the tube end was rolled flush.
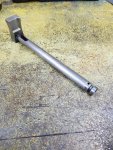
I changed the entire profile of the head. It turns out that it didn't need to be like it was lol. The "Gen 2" version is much easier to machine and only requires 2 op's. I made the first piece from 1018, I think I'm going to stick with that to ensure weldability.

Welding the head on; a few of you mentioned ditching the chamfers in the weld joint so that's what I did; this was great advice. I did use some 0.045" filler because the risk of cracking was mentioned. In the end, @Plastikdreams advice to "tig the piss out of it" was sound. I got a nice bead around the seam and kissed it on the belt sander to clean it up.
I tried to tig the opposite side but it didn't turn out so hot. I'm not great with Tig welding inside corner joints; add in that the thinnest part was round and it was a recipe for disaster. I gave up while I was ahead.
The opposite side has great penetration and it is a weld that I am confident I can replicate 200 times. It will be sufficient to hold the assembly together.
Thanks again for everyone's help, this thread was very beneficial for me.
First, @Garwood idea for the big pipe cutter bead roller worked great, even turning the tube by hand. However, my shop made roller needs a bit of work. I used a 1/8" radius on either side of an 1/8" wide roller. I figured if the roller came to a slight point it might help to start the bead.
This worked up to the point where the material became thin and cracked. It wasn't terrible though and might even be preferable because it rolled one side in and cut off the remaining material. A few taps with a hammer and the tube end was rolled flush.
I changed the entire profile of the head. It turns out that it didn't need to be like it was lol. The "Gen 2" version is much easier to machine and only requires 2 op's. I made the first piece from 1018, I think I'm going to stick with that to ensure weldability.
Welding the head on; a few of you mentioned ditching the chamfers in the weld joint so that's what I did; this was great advice. I did use some 0.045" filler because the risk of cracking was mentioned. In the end, @Plastikdreams advice to "tig the piss out of it" was sound. I got a nice bead around the seam and kissed it on the belt sander to clean it up.
I tried to tig the opposite side but it didn't turn out so hot. I'm not great with Tig welding inside corner joints; add in that the thinnest part was round and it was a recipe for disaster. I gave up while I was ahead.
The opposite side has great penetration and it is a weld that I am confident I can replicate 200 times. It will be sufficient to hold the assembly together.
Plastikdreams
Well-known member
Good stuffUpdate:
Thanks again for everyone's help, this thread was very beneficial for me.
First, @Garwood idea for the big pipe cutter bead roller worked great, even turning the tube by hand. However, my shop made roller needs a bit of work. I used a 1/8" radius on either side of an 1/8" wide roller. I figured if the roller came to a slight point it might help to start the bead.
View attachment 2930
This worked up to the point where the material became thin and cracked. It wasn't terrible though and might even be preferable because it rolled one side in and cut off the remaining material. A few taps with a hammer and the tube end was rolled flush.
View attachment 2931
I changed the entire profile of the head. It turns out that it didn't need to be like it was lol. The "Gen 2" version is much easier to machine and only requires 2 op's. I made the first piece from 1018, I think I'm going to stick with that to ensure weldability.
View attachment 2932
Welding the head on; a few of you mentioned ditching the chamfers in the weld joint so that's what I did; this was great advice. I did use some 0.045" filler because the risk of cracking was mentioned. In the end, @Plastikdreams advice to "tig the piss out of it" was sound. I got a nice bead around the seam and kissed it on the belt sander to clean it up.
I tried to tig the opposite side but it didn't turn out so hot. I'm not great with Tig welding inside corner joints; add in that the thinnest part was round and it was a recipe for disaster. I gave up while I was ahead.
The opposite side has great penetration and it is a weld that I am confident I can replicate 200 times. It will be sufficient to hold the assembly together.